
Share:
Photoetch Parts vs Resin Details: Which Fits? (26.10.26)
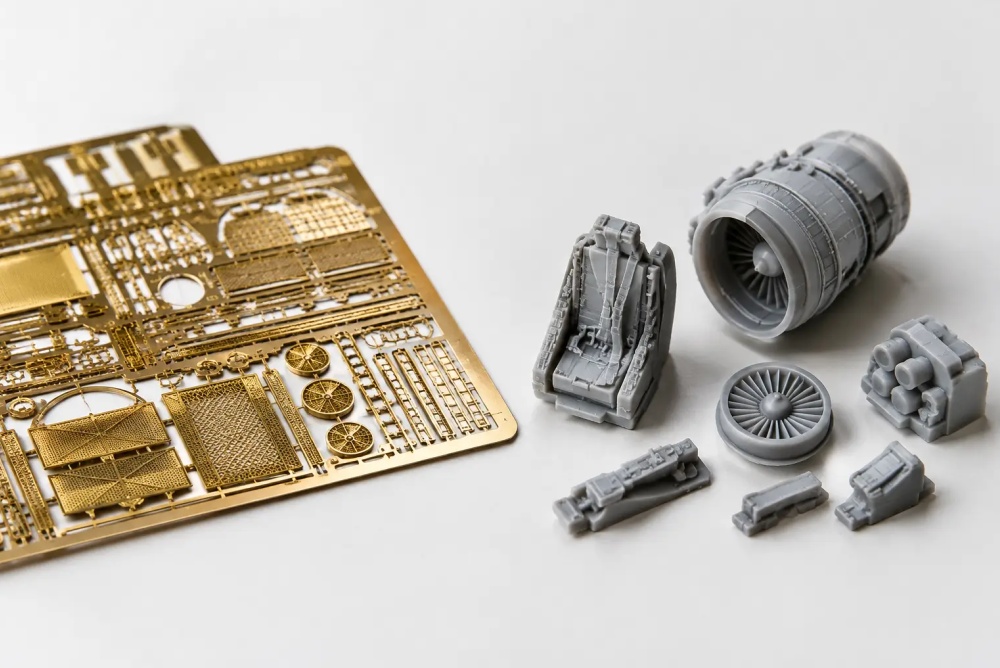
A 1/48 cockpit can look busy with a few carefully placed levers, belts, and instrument faces, yet still look wrong if the seat has the kit’s thick, simplified shape. That is the practical question behind photoetch parts vs resin details: not which material is universally better, but which one represents the specific component most convincingly at your scale.
Both are established aftermarket options, and both can transform a basic kit. Photoetch brings extremely thin metal parts for flat or delicate structures. Resin delivers depth, relief, and complex three-dimensional forms that injection molding may simplify. Choosing well saves money, avoids unnecessary work, and produces a model that looks detailed rather than merely crowded.
Photoetch Parts vs Resin Details: The Material Difference
Photoetched parts are chemically etched from thin brass, nickel-silver, or stainless steel sheet. Their main advantage is scale thickness. Aircraft seat belts, canopy frames, radar arrays, ship railings, armor fenders, grille screens, and bracketry can be represented at a thickness that plastic parts cannot usually match.
The limitation is equally clear: photoetch begins as a flat sheet. It can be folded, curved, rolled, and layered, but it does not naturally reproduce substantial volume. A photoetched cockpit sidewall may add switches and placards, while a resin sidewall can reproduce wiring runs, boxes, quilted padding, and deep structural relief in one casting.
Resin is cast in silicone molds, allowing undercuts and sharply defined surface detail. It is particularly useful for replacement cockpits, ejection seats, wheels, engines, exhausts, gun barrels, ordnance, conversion noses, and corrected control surfaces. Good resin parts can show fabric texture, casting marks, weld beads, bolt heads, and recessed detail with remarkable clarity.
Neither material is automatically superior. A ship’s 1/350 inclined ladder benefits from photoetch because its steps and side rails must remain fine. A 1/48 radial engine benefits from resin because cylinders, pushrods, and crankcase detail need genuine depth.
Where Photoetch Earns Its Place
Photoetch is at its best when the real item is thin, perforated, or made from sheet metal. On armor subjects, this includes engine screens, tool clamps, mudguard brackets, light guards, and stowage-bin hardware. On aircraft, it commonly covers seat belts, cockpit panels, canopy details, dive brakes, aerials, and access panels. Ship modelers use it for railings, doors, radars, crane structures, ladders, and catwalks.
Pre-painted photoetch instrument panels and harnesses can also speed up a cockpit, especially in 1/72 and 1/48. They offer sharp dial faces and readable placards without the need to paint every switch. The trade-off is that a layered, pre-painted panel may look slightly flat from an angle, particularly in larger scales where a resin or plastic panel with individual instruments has more physical presence.
Working with photoetch requires a clean, deliberate approach. Remove parts with a sharp blade or dedicated cutter against a hard surface. Sand attachment points lightly. Fold parts with a bending tool, smooth-jawed pliers, or a steel rule and blade, depending on their size. Dry-fit before applying adhesive because repositioning is limited once cyanoacrylate glue takes hold.
For curved parts, roll the metal gradually around drill bits, paintbrush handles, or a suitable dowel. Do not force a tight bend in one movement. Brass can be annealed with heat for difficult curves, but many modelers will not need that step for standard cockpit or armor sets.
The common mistake is adding every part supplied in the fret. If a plastic kit detail is already convincing, replacing it with a fragile metal alternative may not improve the finished model. Use photoetch where its thinness remains visible after paint and weathering.
When Resin Is the Better Upgrade
Resin is the stronger choice when a kit part has the wrong shape, lacks surface depth, or needs to be replaced rather than overlaid. A well-cast resin ejection seat, for example, can provide accurate cushions, harnesses, survival packs, firing handles, and side details that would take extensive work to reproduce from the kit seat and a flat metal harness.
Replacement wheels are another practical example. Resin can provide correct tire cross-sections, weighted sidewalls, fine hub detail, and tread patterns. On an aircraft or military vehicle with prominent wheels, this can be a more visible upgrade than an extensive interior set that will be largely hidden after assembly.
Resin conversion sets deserve extra planning. A new nose, fuselage section, turret, engine installation, or alternate control surface can correct a variant that is unavailable in plastic. However, conversion work is not simply an accessory purchase. Check the stated kit compatibility, scale, and version carefully. Even a correctly labeled conversion may require cutting, shimming, sanding, and reference work.
Preparation matters. Wash resin parts in warm water with a small amount of dish soap to remove mold-release residue. Remove casting blocks slowly with a razor saw, leaving a margin that can be sanded back. Wear a suitable mask when sanding or sawing resin, and keep dust under control. Test-fit repeatedly before committing with cyanoacrylate or two-part epoxy.
Resin can be brittle, especially with thin antennas, landing gear details, or finely cast exhausts. It also may arrive with minor warping. Warm water can often soften a bent part enough for careful correction, followed by cooling in the desired position. Do not assume every imperfection is a defect, but do inspect delicate parts before beginning the build.
Fit, Finish, and Scale Considerations
The smaller the scale, the more selective the upgrade choice should be. In 1/72, photoetch can make a major difference in cockpit belts, antennas, screens, and airframe details because the original plastic may be noticeably overscale. Resin cockpit replacements are still worthwhile, but only if the canopy arrangement allows viewers to see the result.
In 1/48, both materials are highly effective. Resin seats, wheels, exhausts, and cockpits offer strong visual returns, while photoetch handles belts, panels, screens, and external details. This scale often rewards mixing the two: resin for bulk and relief, photoetch for thin hardware.
In 1/32, large aircraft models expose more of the cockpit and landing gear bays, making resin interiors and structural replacements especially compelling. Photoetch remains useful, but large flat metal panels can sometimes look too sharp or two-dimensional unless carefully formed and blended.
For 1/350 ships, photoetch is often the primary detailing medium because railings, ladders, cranes, and radars are so prominent. Resin can add boats, turrets, fittings, and specialized equipment, but it does not replace the need for fine metal structures. For armor, the balance depends on the vehicle: photoetch excels at fenders and screens, while resin is ideal for stowage, wheels, figures, replacement turrets, and corrected hull components.
Painting is another deciding factor. Photoetch benefits from a metal primer or a reliable primer coat to improve paint adhesion. Avoid heavy paint layers that fill fine perforations and engraved lines. Resin accepts primer well once cleaned, but its detailed surfaces reward thin paint and controlled washes rather than broad, opaque coverage.
Choose the Upgrade That Will Be Seen
A detail set should serve the finished model, not the product listing. Before buying, look at the kit’s weak points, the display angle, and how much of the area will remain visible. An aircraft with a closed canopy may need only a resin seat and photoetched belts. An open-canopy display may justify a full cockpit. A tank covered in stowage may benefit more from resin accessories than from a complex interior set that disappears under the hull roof.
Budget and build time belong in the decision as well. A photoetch set can contain dozens of tiny parts and demand careful handling. A resin replacement may solve a visible problem quickly, but a conversion set can turn a straightforward project into a serious fitting exercise. Product descriptions, scale designation, and stated kit compatibility should guide the purchase, not just attractive package artwork.
For dedicated builders, MODELIMEX stocks both types of aftermarket upgrades across aircraft, armor, ships, cars, and figures, making it easier to compare solutions for a specific kit and scale. The best choice is usually the one that corrects the most noticeable limitation with the least unnecessary complication.
Build the major shapes first, then add the details that support them. A thin photoetched grille and a properly shaped resin wheel can do more for a finished model than a fret full of parts hidden forever inside it.
(This article was created by AI)